How To Diamond Painting [20 Steps]
Are you confused about Diamond painting or would want to make sure that you know how to go about your first Diamond Painting Kit? Well, in that case, you have come just to the right place.
Why Diamond Painting is so Trending?
Diamond painting is the craft of an extraordinarily constructive mind. Creative people oftentimes crave for something intrinsically interesting like this sort that would keep them interested and serve as a challenge at the same time. Moreover, passion for classic creativity lends you a strong impulse for diamond painting.
Painting with Diamonds is slightly unique in respect to the other paintings that fall in this category. Unlike other types of painting, this one requires you to use diamonds, crystals, and flat-backed rhinestones instead, which gives the overall finished product a 5D look. Apart from being a hobby, there are strong reasons to do diamond painting.
Diamond Painting is a Step by Step Process
If you have a penchant for diamond painting, this exclusively-written article is going to help you kick-start your hobby. It is written to serve as a guideline and instruction manual for those who want to try their hands at this art. Take a read with diligent attention!
-
Gather a diamond painting kit
First and foremost, you are required to collect all the essential tools that will be needed to execute a diamond painting.
Things you must possess:
- A pre-printed canvas.
- Flat-backed diamonds
- A plastic tray
- A pen-shaped tool (diamond painting pen)
- Gel/Wax
The diamond painting kits are now easily available in art & craft stores as well as in online stores. You just need to buy your diamond painting kit & you'll get all essential tools to complete this project.

-
Flatten the Canvas
If the canvas is rolled, straighten it by laying it on a flat surface. Level all four sides and edges of the canvas & put some heavy weight on it like a pile of books. You can also flatten it even by ironing it on low heat setting. Use towels to iron your canvas & avoid direct contact of the canvas with the heat. Once your canvas is flatten then you can proceed to next steps.

-
Breeze through the Canvas
Learn to read the canvas properly. A canvas contains numerous tiny boxes that are either colored differently or marked with numbers/letters. There’s a chart with diamond colors and numbers given on it. Bear in mind, every color relates to a number/letter. You are supposed to follow this chart and do the rest, accordingly. So, before you begin, take a look at the chart and come up with a game plan on how you must move ahead. It will be very helpful if you use a magnifying glass for this.

-
Remove the covering
There will be a protective sheet over the canvas. You got to get rid of it step by step while working on your diamond painting project. Remove it carefully and do not let it roll forward. Do not remove the complete covering altogether. Otherwise, the glue on the canvas will be dried out making it hard for you to work on your canvas. Remove the protective sheet in sections. Keep all remaining areas of the canvas covered that aren't under working.

-
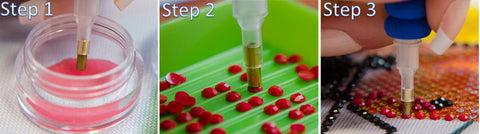
Take out one bunch of diamonds
Consider the part that was just revealed to you and take a good look at the boxes and the symbols/numbering and colors they come with. Then open the diamond that relates to them and starts filling out your tray with the one group of colors, and keep adding on as you proceed. Shake your diamond tray gently to settle diamonds for easy picking process.

-
Unwrap the packet of wax
Since wax is sticky, you can use it to get the crystals glued to your diamond painting pen. Take your pen and dunk its end in wax or gel. Once the wax is applied then the tip of the pen will be sticky enough to hold the diamonds to apply on the canvas.

-
Pull the crystal and place it rightly
Pick one crystal up with the help of the pen decently dipped in gel/wax, and place it in its respective box. Make it sit well in the box by pressing on edges as well as center. The canvas will be sticky & hold the diamonds firmly.

-
Complete the placement of all crystals
Just like you inaugurated the movement by placing the first crystal in its right place, you are supposed to bring each crystal from the tray to its pertinent box. Within no time, you will be done with an entire tray of crystals.
On a side note, you don’t have to fear to lose any crystal in the middle of the movement because the gel keeps it firmly stuck to the pen.
-
Remove the protective sheet from the next section
Once you've completed one section of the canvas from where you removed the protective sheet, you can move towards next section. Slowly and gradually, unveil all sections of your diamond painting canvas. Focus on the number written in the boxes, and memorize that code.
-
Find the bag with the exact same code number
Once you have noted the number hidden under the next section of your canvas, you ought to sort out a crystal-containing bag with the same number written on it.

-
Dish out the next bunch of crystals
Open the bag in one go. Take the crystals out in a tray; all crystals would be colored alike. Try to settle them properly in the tray. Once all the diamonds of this color are applied to the canvas then move towards next color & so on.
-
A collaboration of gel and diamond painting pen is perfect
Diamond Painting pen will make this whole process easy & fun for you. Keep the tip of the pen sticky with the help of provided wax with your diamond painting kit. If you feel the tip of the pen is dried up then remove the old dried wax & dip the pen tip again in the wax strip. A very small amount of sticky wax will do the magic.

-
Fill out the vacant space in canvas
Pick each crystal one by one from the tray and fix it in the appropriate place. Occupy all the boxes in that particular part of the canvas. Once the section is completely done, you can proceed to the next section.

-
Repeat the process thoroughly until it is done
Continue removing protective sheet separately and in succession. Keep adding crystals in the boxes, with finesse, until it reaches completion. In this way, all of the sections of the canvas will be completely covered by diamonds.

-
Lay a plastic sheet on the canvas.
After your diamond painting gets completed, you ought to cover the canvas with the plastic sheet to protect your diamond painting from dust & debris. Otherwise the shine of the diamonds will fade out. You should only remove the plastic sheet when you are planning to get your diamond painting framed & hanged for display.

-
Put a heavy object upon the canvas covered with plastic sheet
Once your diamond painting is complete & covered with plastic sheet then you can put your canvas under heavy weight to assure the uniformity of the applied diamonds. It will protect the diamonds from popping up & falling off. You can place either a pile of books or a cutting board or an empty box on the canvas -- to level its surface and to make all the diamonds uniform.

-
Flatten it using your hands if it sounds risky to put an object
If you do not want to take the risk of placing a massy object upon the canvas, you can level it off by moving your hands smoothly all over it. Or you can use scraper tool specially designed for this purpose.

-
Separate that plastic sheet from the canvas
After a little while, remove the object you placed upon the canvas, and subsequently eliminate the plastic sheet. Do not remove the sheet roughly or hastily. Be very watchful while separating it.
-
Seal your diamond painting
After removing the plastic sheet, it's not wide to leave your diamond painting canvas unattended. You can seal your diamond painting with the help of diamond painting sealer. The sealer will help to protect the diamonds from falling off. The canvas will be protected from dirt & debris and the shine of the diamonds will remain intact. You can also learn more about Sealing & Framing a Diamond Painting.

-
Install it in a frame of your choice
Once your diamond painting is sealed then it's ready to be framed. Sealed diamond painting can also b hung without framing. However, to add an extra layer of safety & to make your diamond painting look more fancy, you can go with the framing option. First, draw out the glass from the frame, and then situate the painting inside the frame.
Put icing on the cake and get your painting framed!

With these 20 steps tutorial, you are well on your way to getting things sorted out for you. So buy yourself a diamond painting kit today and unleash the artist in you. Also give a read to our 20 diamond painting tips.
Diamond Painting: Common Mistakes to Avoid
Embarking on the journey of diamond painting can be an exhilarating and creative experience, offering a world of color and sparkle that transforms into stunning artwork. As with any craft, however, beginners and even seasoned artists can encounter certain pitfalls. To ensure your diamond painting experience is as enjoyable and successful as possible, it's important to be aware of common mistakes. By learning to avoid these, you can enhance the quality of your work and truly enjoy the process of creating your diamond art.
- Incorrect Diamond Placement: Placing diamonds haphazardly can lead to a misaligned and messy look. Always place diamonds carefully and squarely within each designated area.
- Using Too Much Wax: Overloading the diamond applicator tool with wax can lead to a mess on the diamonds and canvas. A small amount is sufficient for picking up the diamonds.
- Not Flattening the Canvas: Working on a wrinkled canvas can make it difficult to place diamonds accurately. Always ensure the canvas is flat before starting.
- Ignoring the Color Scheme: Mixing up colors or not following the color guide can disrupt the intended design. Pay close attention to the symbols and corresponding colors.
- Losing Diamonds: Diamonds can be easily lost if not handled carefully. Store them in labeled containers to keep them organized and secure.
- Rushing the Process: Rushing can lead to mistakes in placement and overall design. Take your time to enjoy the process and ensure accuracy.
- Not Sealing the Painting: Failing to seal the painting after completion can result in diamonds falling off. Use a sealant to protect your finished artwork.
- Neglecting to Stretch the Canvas: Before framing, it’s important to stretch the canvas to ensure it fits well and displays nicely.
- Improper Lighting: Working in poor lighting can strain your eyes and lead to color mix-ups. Use a well-lit area or a light pad for a better experience.
- Overlooking the Canvas Size: Starting with a too large or complex canvas can be overwhelming for beginners. Begin with a manageable size to build confidence.
Avoiding these common mistakes can significantly enhance your diamond painting experience. Remember, the key to a beautiful diamond painting lies not just in the shimmer of the stones but in the care and attention you put into every step of the process. Take your time, enjoy each moment, and watch as your canvas transforms into a masterpiece. With patience and practice, your diamond painting skills will flourish, leading to stunning artworks that you can proudly display or share with others. Happy diamond painting!


I believe that you don’t learn until you do it yourself, This blog post is really helpful though for beginners. Everything is explained in a nice and fluent way, Matching with the mindset and conditions of daily house life people like me, Much Appreciated.
Must read before doing diamond painting
God bless you all, Have a good day.
Short but Informative. Thumbs Up!
That explains a lot. Thank you